Back to the Celtic Braid Coat:
The “wings” of the cape are 33 inches wide, which is a problem if you only have 22.5″ fabric. The solution, of course, is to join the panels. The problem with that solution, of course, is that this particular fabric has very prominent stripes, meaning if you’re just a little off, it will be obvious from a mile off.
So yesterday night, in a fit of insomnia, I top-basted two panels together, then basted the seam, then machine-stitched and pressed the seam, using a clapper to flatten the seam as much as possible.
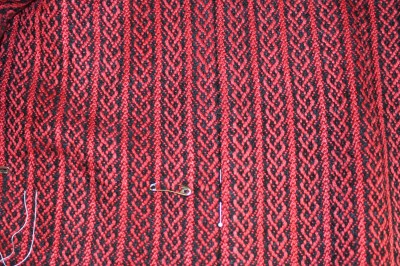
I am pleased with the results:

The vertical pin shows the seam. Except for a not-terribly-obviously squiggle near the center of the photo, it’s essentially invisible. I’m going to go back and do some more examination/analysis of the seamline to see if there’s a more accurate way of basting, so I can eliminate the squiggle as well. But I may be stuck re-stitching portions of the seamline as I go.
And the rest of my leather-sewing tools and materials have arrived, meaning I have no more excuses not to work on it. Since I have six weeks left to sew it, definitely time to get cracking!
In my copious free time, I am also studying up on Adobe Illustrator. I want to use it for my fashion sketches. I have a Wacom tablet (which can be used for drawing) which I can use for the preliminary sketches, then clean them up for more detailed simulations. The advantage of Illustrator over pen and pencil is that mistakes can be un-done! and I can construct much more detailed fashion drawings than I could with more physical materials. I am far better with a computer than with colored pencils! I’ll post the results of my experimentation here, of course.
I have also decided to start draping muslins for some of the more interesting designs, just to see if they’ll work. I am under no delusions that I can create an insta-pattern from the muslins (I haven’t refined my technical skills that far yet), but it will be fun and challenging, and I’ll learn a lot even if I don’t get the exact results I’m after.
But first, back to work on the coat!
