Tien Chiu

  • Home
  • About
    • Honors, Awards, and Publications
  • Online Teaching
  • Gallery
  • Essays
  • Book
  • Blog
  • Dye samples
You are here: Home / Archives for laura fry

August 6, 2009 by Tien Chiu

What I Did on My Summer Vacation

A recap of the last five days:

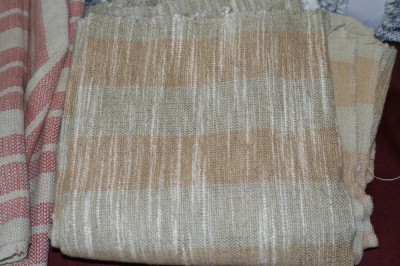
two 5-yard warps for tea towels:
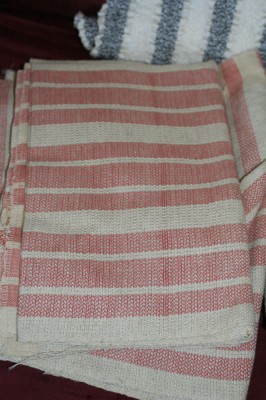
First set of tea towels (Laura warped this one for me)
2nd set of tea towels (I warped this set!)

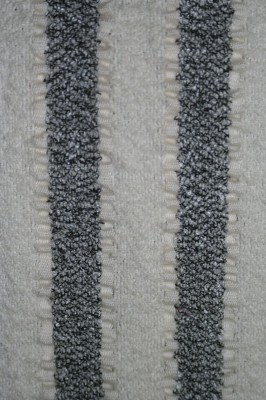
A 5-yard warp’s worth of collapse weave samples (now neatly indexed and ready to go into binders):
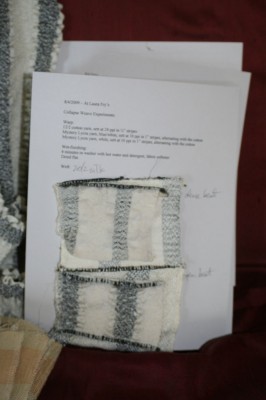
Collapse weave samples

A shawl from the collapse weave sample I liked best:
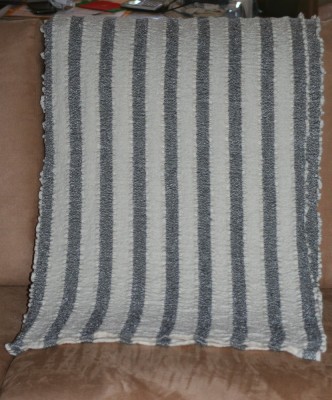
Collapse weave shawl, full view

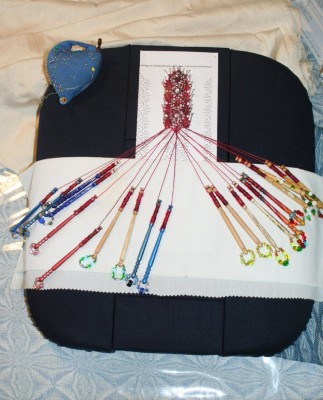
And learned to make bobbin lace, producing three bookmarks (my first one not shown because I left it behind in Canada; Laura’s mailing it back to me)
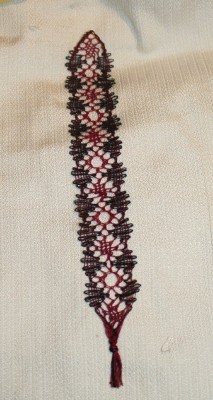
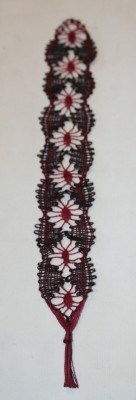
Bobbin lace bookmark - my second project
Bobbin lace bookmark #2
3rd bobbin lace bookmark, this one with spider stitch

Not bad for 5 days!

And now I’m home, re-energized, refreshed, and ready to go!

(By the way, if you are interested in studying with Laura in her studio, it’s only $100/day with hotel, or $125/day if you stay at Laura’s.  If I were you I’d jump on it!  Her contact info is on her website at http://www.laurafry.com .)
Filed Under: All blog posts, textiles, weaving Tagged With: bobbin lace, collapse weave, laura fry

August 5, 2009 by Tien Chiu

Collapse weave shawl, bobbin lace #3

The collapse weave shawl came out BEAUTIFULLY!  Here are two photos:

Collapse weave shawl, full view
Collapse weave shawl, closeup

Isn’t it stunning?  I LOVE the ruffled “ribbons”.

Hard to believe that that’s “just” plainweave, but it is!

And, I finished my third bobbin lace bookmark.  Here is a Very Bad Photo, but you can get the general idea…

3rd bobbin lace bookmark, this one with spider stitch

I fly home today, so I’m not starting any new projects.  Instead I’ll be roving through Laura’s voluminous swatch collection and library, looking for inspiration, information, and good reference texts to add to my library later (after I have a job again).

This has been fun!!  I can’t imagine a vacation I’d rather have than this one.  🙂

Filed Under: All blog posts, textiles, weaving Tagged With: bobbin lace, collapse weave, laura fry

August 2, 2009 by Tien Chiu

Speed and samples

I timed myself this morning, out of curiosity: 28 picks took about 45 seconds, so I’m weaving at about 1.6 seconds/pick (plainweave on a treadle loom, 20″ wide warp).  This is considerably faster than my previous speed – for example, the dress fabric was weaving up at about 2.75 seconds per pick.  Not really a fair comparison considering that I had to double-beat each pick to clear the shed, but I wouldn’t be surprised if this week of study takes half a second per pick (or more!) off my weaving speed.  Considering that I was estimating the 20 yards of dress fabric at 60 ppi to be about 43,200 throws of the shuttle, that could be 21,600 seconds saved over the course of the weave, or about 6 hours of weaving time.  Pretty hefty savings, especially if my speed improves further.

Another piece of advice Laura gave me was to have the AVL switch sheds when the shed is open rather than when it’s closed.  This makes perfect sense to me, but I might have to purchase the Fiberworks PCW AVL loom driver to do it – I use WeaveIt Pro to drive my loom and I’m not sure whether it has the appropriate setting.  And my laptop just died so I have no access to anything right now.  (Sandra, if you’re reading this, can you tell me whether this can be done in WeaveIt Pro?)

At any rate, I wove off a 5-yard warp today, along with finishing up my first bobbin lace bookmark and starting a new bobbin lace bookmark with some different stitches Laura’s been showing me.  (Don’t look too impressed about the warp; it was a plainweave sett at 20 epi, with a relatively thick weft.  I also wasn’t making any particular attempt at good selvedges, etc. – the purpose of this warp was purely to concentrate on ergonomics, technique, and get the “feel” of weaving smoothly and rhythmically.  It’s definitely not my best weaving.)

I will post photos of the bookmarks tomorrow, I’m hoping to finish the other one tomorrow morning, early, and be able to post photos of both at once.  I botched one segment of the first bookmark (I think it was my second bobbin lace motif ever, so I have some excuse) but the rest of it looks GREAT!  I’m very happy.  Also thinking about how I can fit bobbin lace into the dress.  LOL!  I’m definitely not going to replace that gorgeous Alencon lace with my beginner attempts at bobbin lace, but maybe an edging around the bottom of the dress?

Or maybe not.  Who knows?

Tomorrow we’re going to have some fun sampling.  I wanted to play around with differential shrinkage and collapse weaves (basically anything that does dramatic things when it hits the water, since Laura is the expert on wet-finishing), and Laura has two new-to-her Lycra yarns in the studio, so we’re going to warp up the loom with those two yarns and some 12/2 cotton, 1-inch stripes of the two yarns alternating with 1/2-inch stripes of the cotton.  Then we’re going to weave with a variety of wefts, including a highly twisted singles, a Lycra yarn, a wool yarn (etc.) just to see what happens.  This sounds absolutely delightful, and a good opportunity to practice ergonomic weaving on plainweave.

(Why am I weaving so much plainweave, since I love to dabble in complex structures?  It’s to simplify learning the ergonomics: having to remember a treadling pattern distracts me from focusing on my body, “reading” the movements of weaving and seeing how one flows (or doesn’t) into another.  Also, plainweave most closely approximates my home weaving, since I have a computer-driven loom.)

Now, to answer a couple of questions:

Michelle wrote:

I’d love to see some photos of the warp going on and actually staying in the beam sections.

The warp that went with those photos wasn’t beamed into the sections; it was beamed using the sectional beam as you would a plain beam (ignoring the dividers).  So the ends weren’t fitted neatly into the dividers, though I have some interesting ideas for how this might be managed if necessary.

Ruth wanted to know exactly what steps were “counted” and how long the warp was in the 15-20 minutes to beam the warp.  I was speaking specifically about beaming the warp (not rough sleying or winding the warp), and I’m not sure of the length – Laura’s out of the house right now so maybe she can answer that later.  I’ll time things on the sample warp I’m winding (though it may not be a good example, being only 5 yards long) and maybe that will provide a better idea.

I am, however, COMPLETELY sold on the warping trapeze as an alternative to the “crank the beam, walk around to the front of the loom and jerk on 1″ bouts of all the threads the entire width of the loom, walk to back, crank on 1 turn and repeat” method.  THAT drove me nuts when I was working with a plain beam – aside from taking absolutely forever (I was working with very small back beams, usually about 2-3″ in diameter, so even one yard would be 4 turns of the beam!), it gave me blisters on my fingers.  I’d never go back to that method, having seen this one.

Off to bed!  Tomorrow, bobbin lace, and winding/beaming that warp.  I have two more days left here, and want to get in as much as possible before leaving.

This is GREAT – I’m learning tons and getting to dabble in a lot of different areas of weaving.  I’ve already gotten some interesting ideas for things to explore once I get home.

And Laura is a WONDERFUL teacher.  Do study with her if you get the chance!

Filed Under: All blog posts, textiles, weaving Tagged With: laura fry

August 2, 2009 by Tien Chiu

Bobbin lace and a thought on threading

Yesterday Laura showed me (among many other things) how to do bobbin lace.  It turns out to be just as simple as she said it was – at least for the introductory bookmark she had me working on – I literally had it down in ten minutes.  I worked on it a bunch last night, and a bit more this morning – addictive and fun! though I don’t think I could see myself doing a full 10 yards of lace trim for the dress from it (though I did think about it!).  I’m going to see if I can finish this bookmark while I’m here, and then once I get home, I’m going to see about getting myself a bobbin lace pillow of my own.  Not sure I can afford one, so if anyone knows where I can get used bobbin lace equipment I’d appreciate it.

At any rate, here is a photo of my proto-bookmark:

Bobbin lace bookmark, in progress

Laura and I worked on ergonomics for a good part of the day, but I’m saving those photos for when I get home and can edit and post the videos we took.

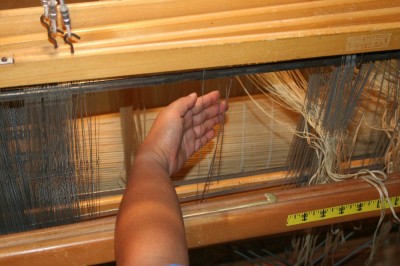
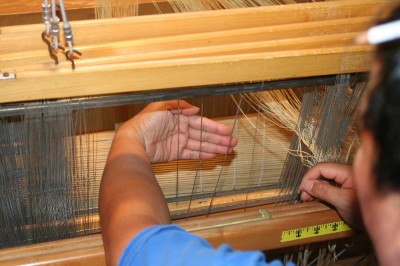
She did have one thought on threading, though, that I thought I’d share.  Typically when threading up straight draw, threading instructions have you starting with the shaft nearest you and then going to the shaft furthest away.  (e.g., 1, 2,3, 4…16).  As Laura pointed out, this is a very non-ergonomic way of threading if you are threading right to left (as most right-handed people do) – because you have to reach around the shafts in the back to thread the shafts in front.

A photo is worth 1000 words here:

Threading from back shafts to front shafts:

Straight draw, threading from back shafts to front shafts

Notice how the hand is at a comfortable angle.

Now, let’s look at it threading from front to back, according to convention:

Threading from from front shafts to back shafts.

See how awkwardly the hand is canted to reach around the back shafts to get to the front shafts?

I had never really thought about it, but it makes total sense now!

(Laura pointed out that there is one other advantage to threading this way: when it comes time to sley the reed, it’s much easier to grab threads from the next set because you don’t have to worry about getting the threads wrapped around each other.  If you thread ascending, then you have to get shaft #1’s thread – pulling on shaft #2’s thread from the side will pull shaft #1’s thread around the heddle, and produce very unpleasant effects when you’re weaving.  If you thread descending, there’s no way for them to wrap around the heddles.)

Anyway, that’s it for the moment – gotta go make myself breakfast, and then get back to that bobbin lace!!!

Filed Under: All blog posts, textiles, weaving Tagged With: bobbin lace, laura fry

August 1, 2009 by Tien Chiu

Putting on a warp

So, yesterday Laura showed me how she puts on a warp – quickly and efficiently.

I had asked her how to handle putting a painted warp onto a sectional beam.  I’d never tried doing this before, thinking that you had to beam a sectional beam in sections, but it turns out that you can beam onto it just as you would a plain beam.  So that’s exactly what she did.

First, she rough-sleyed a reed and inserted temporary lease sticks into the cross.  Then, she slipped a rod through the looped ends of the warp, and tied onto the sectional beam, as you would for regular back-to-front warping.

Then she threw the warp over a rod hanging from the ceiling.  (Laura refers to it as a warping valet, but Kati Meek refers to it as a trapeze in her book Warp with a Trapeze and Dance with Your Loom – same thing, different names.)

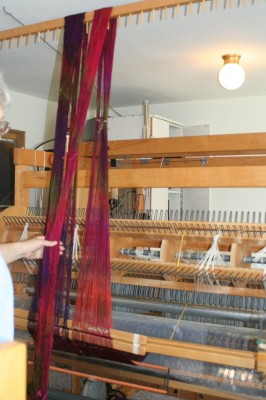
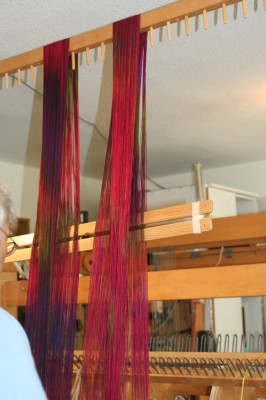
At this point the warp looked roughly like this:

Warping using a warping valet (also called a trapeze)

Notice the rough-sleyed reed (which is used as you would a raddle) and the lease sticks at the bottom of the warp.

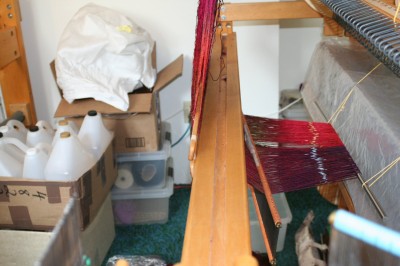
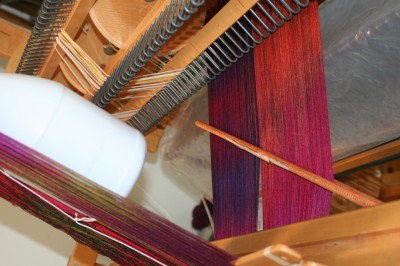
Here’s a side view:

Side view, warping with a warping valet (trapeze)

Notice the reed hanging between the warp beam and the back beam.  I asked Laura why she preferred a reed to a raddle – she said that, among other things, it was easier to tilt the reed to make the warp wider or narrower.  For winding on warps, she doesn’t use warp sticks, instead she narrows the warp gradually as it gets wound on, creating a trapezoidal cross-section that prevents the edges from slipping off.  It doesn’t work on all warps, though.  I’m not sure I can use this method since my loom is built differently (not enough space between the warp beam and the back beam), but it’s a good trick to know about, and I’m sure I’ll try it someday.

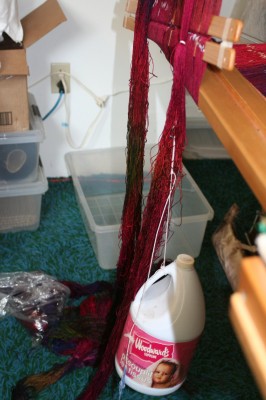
Here’s how Laura weights the warp as it dangles from the trapeze:

Warping with a warping valet (trapeze) - bottom view of warp

There’s a loop of thread (lark’s-head-knot) tight around the warp, attached to an S-hook, which in turn is attached to a gallon jug filled with (I think) water.  This keeps the warp under tension as it’s beamed on.

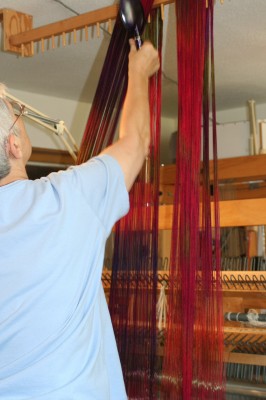
Next, she cut off the choke ties, spread out the warp, and brushed it with a hair brush:

Brushing out the warp

This helped even it out and identify any loose ends.  (It should be mentioned that not everyone does it this way, and some weavers actively recommend against it, but Laura says it works fine for her.  Kati Meek, in her book on warping with a trapeze, recommends “spanking” the warp with a stick to do the same thing.)

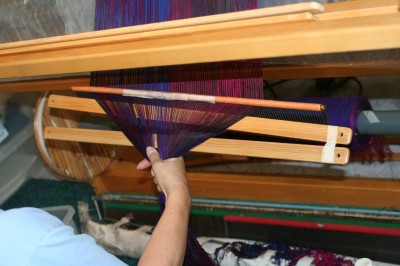
Then she moved the lease sticks as far up as they would easily go:

Moving the lease sticks upwards while beaming on using a warping valet (trapeze)

Once this was done, she started winding onto the back beam.

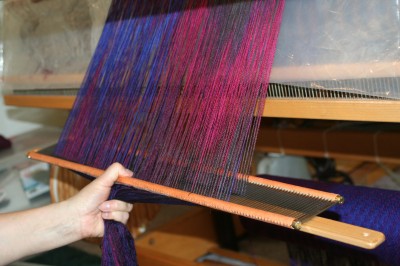
A shot of the reed, turned to narrow the warp slightly:

Reed, tilted to narrow the warp

As the warp wound on, of course, the lease sticks moved down, and the weights moved up.  When the lease sticks reached the back beam, or the weights started to get near the ceiling, Laura would stop, rehook the weights at the bottom, cut the choke ties, and repeat the brushing process, moving the lease sticks up again.  Then she’d wind on another length.

At the end, of course, she came to the reed.  This answered the question that had been nagging at me: if you rough-sley a reed, how do you remove it without disturbing the cross, which is at the other side of the reed?

Turns out to be quite simple (doh!).  You pull the warp through until the lease sticks right up against the reed.  Then you turn the lease stick closest to the reed to make a small “shed”.  You insert a new lease stick through the “shed” on the other side of the reed, and remove the old lease stick.  Then you do the same thing with the other lease stick.

In photos:

Transferring the cross: moving the lease sticks right up behind the reed
Transferring the cross: turning the lease stick nearest the reed to make a small shed.
Transferring the cross: inserting a new lease stick into the "shed" formed by turning the old lease stick on edge, behind the reed.

And that was it!  The warp was fully beamed on, in about 15-20 minutes.  Way, way, faster (and more even) than walking back and forth between back and front to “jerk” the warp!

I’m totally sold on the warping valet/trapeze.  Fortunately, I had made one for myself back when I had the Leclerc Diana….now I just have to FIND all the parts for it!!

Later in the afternoon we worked on weaving ergonomics, and will work on it more today.  Laura took a video clip of me weaving at the beginning (it should be noted that I was still struggling badly with the Fanny), and will take more videos today.  I’m hoping to be able to resize and post them tonight or tomorrow – talking about weaving ergonomics is darned near impossible.  A video is worth a million words!

Finally, in the evening we started working on repairing the many, many flaws in the dress fabric.  It’s a daunting task; we may not finish it before I leave.  But I have my hopes…

Off to a new day’s adventure!

Filed Under: All blog posts, textiles, weaving Tagged With: laura fry

Next Page »

Subscribe to Blog via Email

Information resources

  • Dye samples
    • Procion MX fiber-reactive dye samples on cotton
    • How to "read" the dye sample sets
    • Dye sample strategy - the "Cube" method
  • How-Tos
    • Dyeing and surface design
    • Weaving
    • Designing handwoven cloth
    • Sewing

Blog posts

  • All blog posts
    • food
      • chocolate
    • musings
    • textiles
      • dyeing
      • knitting
      • sewing
      • surface design
      • weaving
    • writing

Archives

Photos from my travels

  • Dye samples
    • Procion MX fiber-reactive dye samples on cotton
    • How to "read" the dye sample sets
    • Dye sample strategy - the "Cube" method
  • Travels
    • Thailand
    • Cambodia
    • Vietnam
    • Laos
    • India
    • Ghana
    • China

Travel Blog

Entertaining miscellanies

© Copyright 2016 Tien Chiu · All Rights Reserved ·


Loading Comments...