Tien Chiu

  • Home
  • About
    • Honors, Awards, and Publications
  • Online Teaching
  • Gallery
  • Essays
  • Book
  • Blog
  • Dye samples
You are here: Home / Archives for phoenix rising kimono

September 11, 2013 by Tien Chiu

Testing acid dyes on cotton

Since I’m thinking of cross-dyeing the finished fabric, I thought it would behoove me to make sure the acid dyes wouldn’t affect the cotton. While acid dyes are generally not effective on cotton, some of them can stain. So before investing a lot of time in weaving the fabric, I figured it would be a good idea to test the dyes. So I spent some time last night “dyeing” the yarns with acid dyes and then trying to remove them by washing.

You would have been forgiven for thinking that acid dyes worked on cotton. The colors “dyed” brilliantly and beautifully, and a few cool rinses did not remove any visible amount of color. But, but! When I simmered them in soapy water, the color came out. Here’s a photo of before and after the hot soapy rinse:

testing acid dyes on cotton

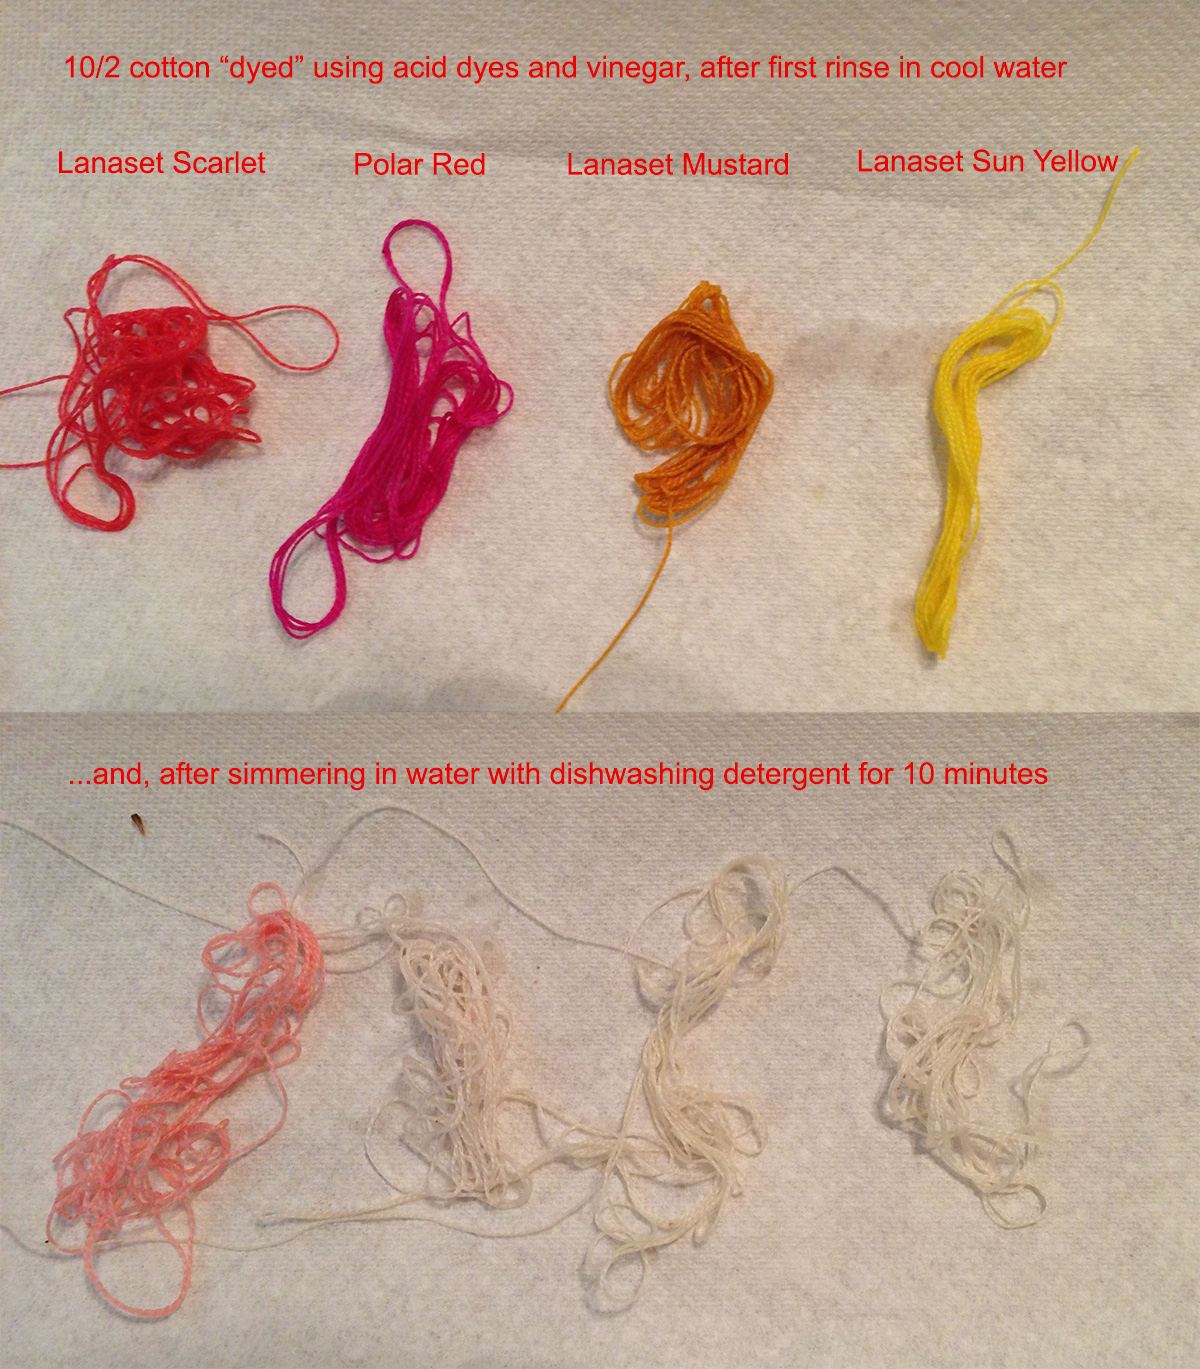
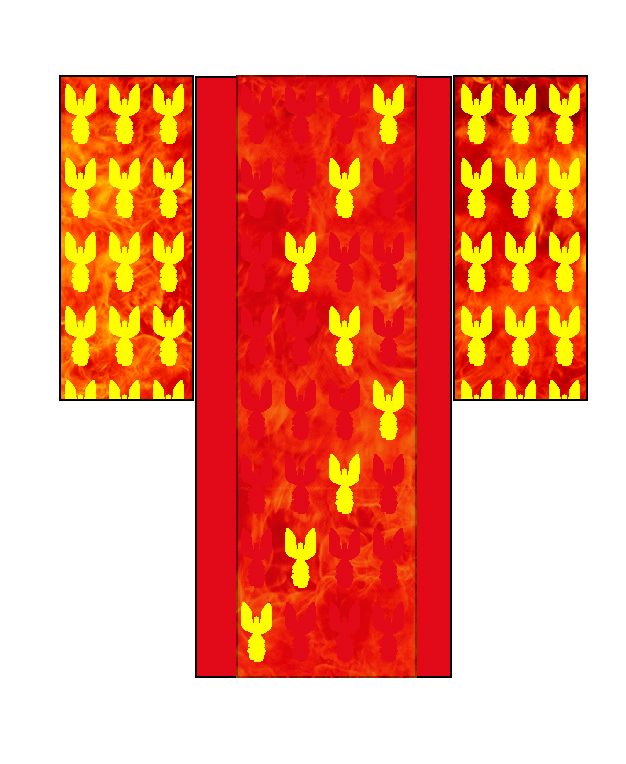
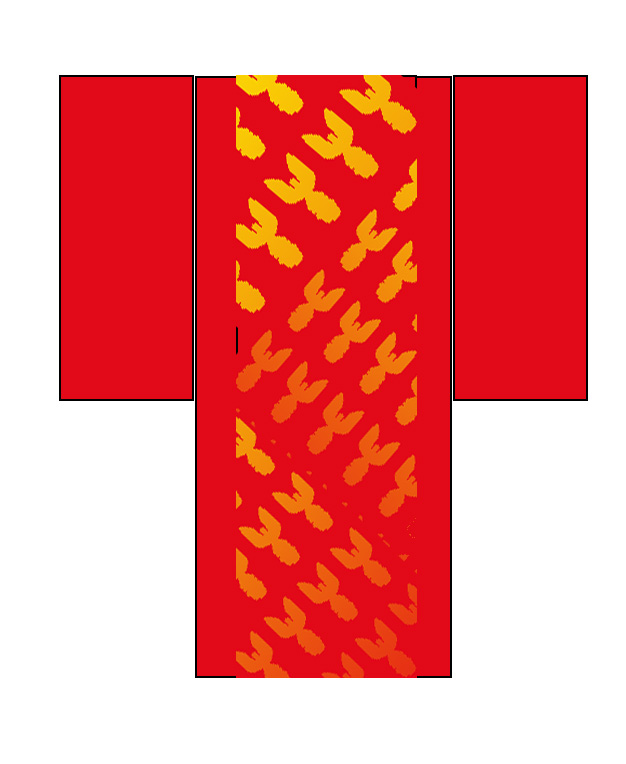
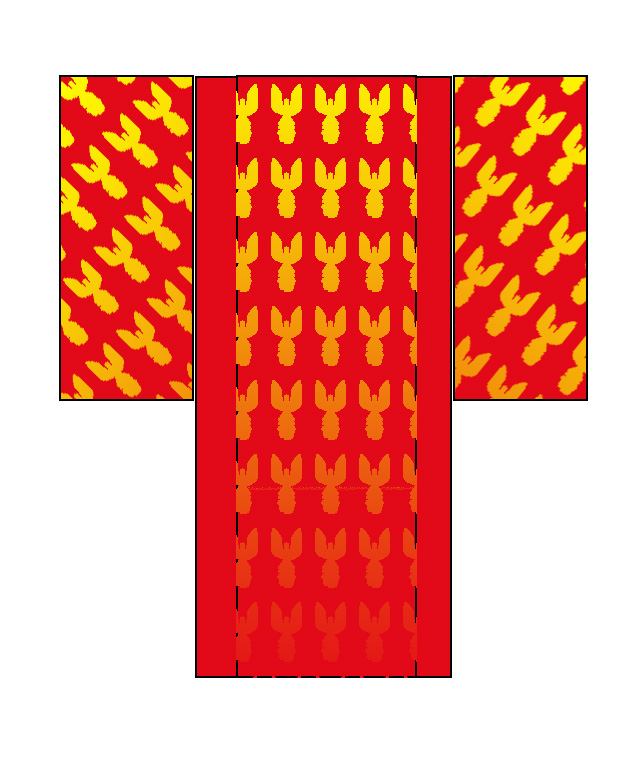
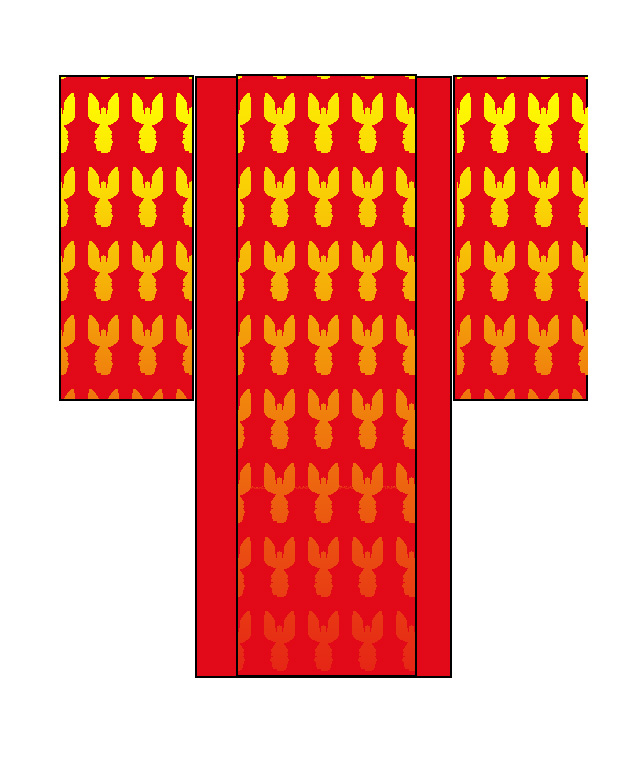
The interesting part is the scarlet, which stained the cotton a pale pink that was not removed by washing. This suggests that scarlet would be a bad choice for overdyeing, if I want the phoenixes to remain bright lemon yellow. However, if I want to dye the phoenixes to match the background slightly, to give the appearance of flying through fire, scarlet might do very nicely indeed. Something to ponder and play with!

I have now cut out the first kimono muslin and sewn a few of the pieces together. Either uchikake are hugely oversized (which is possible since they are outerwear, meant to be worn over a full kimono I think), or I’m doing something wrong. I’m going to sew it up later this morning and see how it looks. I suspect I will do some major alterations to make it fit without an under-robe. It would also trail on the ground by about 8″, which I think is normal for uchikake. However, I will probably shorten it to ankle-length and see if that works.

(For those who have asked about obi – the uchikake is unique among kimono-like garments in that it is not worn with an obi. Since it is outerwear, and mostly ceremonial, I think it’s worn open in front.)

After I finish the kimono muslin, I think I’ll have to ponder the cut of the garment. I’m going up to see Sharon (my sewing mentor) this coming weekend, and will ask her for her thoughts on the design. I may do some radical alterations to the shape of the garment. And I may not. The original reason for keeping the cut simple and rectangular was to avoid chopping up phoenixes, but if I am cross-dyeing and will only have a few phoenixes visible, I can keep them away from the seamlines, enabling a more complex cut. I really would like some shaping around the armholes.

I’m also planning the sample warp for my piece and debating what to do. I would really like to do a full-width sample warp, 10 yards long, to allow the best possible simulation plus room for lots of play. But at the same time, I don’t feel entirely settled on the idea of cross-dyeing – what if I weave the first ten inches only to find that the idea doesn’t work, or is too tedious to weave? Then I’d either have to waste ten yards of silk warp (!) or waste time figuring out something else to do with it and then weaving it off. Also, I don’t yet know the finished sett, so I might wind up with something narrower or wider. Narrower is not a serious issue, but wider would mean dropping ends off the back of the beam, which is a pain to deal with.

The real problem is that I have two questions to answer. The first is “Is this idea viable at all?” and the second is “Where do I want to go with this idea, if it is viable?” I can reduce the time cost of running both experiments by using a single warp for both. However, that also increases the risk of wasting either warp or time if the first experiment fails. Trade-off: ten yards of silk warp (or the time to design and weave off variants on the same) vs. time spent re-warping the loom. Tough call.

I’m inclined to take the riskier path, mostly because I have tons of yarn and not much time. A 10-yard warp will take about ten ounces of 60/2 silk, and since I paid only $35/lb for the silk (bought as a remainder), that means I’m risking a total of $22 in yarn. Measured against the considerable time savings of avoiding warping twice, that seems like an eminently reasonable risk to take.

Filed Under: All blog posts, textiles, dyeing, weaving Tagged With: phoenix rising, phoenix rising kimono

September 8, 2013 by Tien Chiu

Overdyeing

Remember how I was racking my brain about how to get more motion into the kimono? And was thinking about gradients, diagonals, etc?

Today I realized I was being dumb. I can cross-dye the woven fabric, and if I use a mercerized cotton for the heavy thread, I can dye the background however I want without affecting the pattern thread. So I can do things like this:

yellow phoenixes on fiery background

and (with considerably more difficulty) this:

hidden phoenixes
hidden phoenixes

(Photo credit: the fiery background is the result of monkeying with this photo tile, designed by suicidecrew on deviantart.com. Used with permission.)

I’m particularly excited by the possibilities of the second design, which is simpler and has more movement than the first one. However, it may not be technically feasible – I can get the single line of phoenixes or I can get the inferno background, but I’m not sure I can get both. I need to think about this some more.

(I could do this quite easily by resorting to inlay, but the idea of doing inlay for six yards of fabric at 40 epi gives me the heebie-jeebies. I’m nuts, but not quite that nuts.)

Meanwhile, I have started laying out the pattern for the kimono muslin. Holy bejezus, but uchikake kimono are oversized! By my calculations, about 8″ of the back will trail on the ground. I’m thinking I will shorten it to ankle length, and will likely do that in the first muslin.

I also think I know enough about the sample warp to start planning it. I think it will be white 60/2 silk warp, woven with a white 60/2 silk ground weft, metallic gold embroidery thread as accent weft, and a yellow 20/2 mercerized cotton pattern weft. I’m going to make it ten yards long, I think, to give myself plenty of room to experiment with surface design on the finished cloth. I haven’t worked out the width yet – I need to finish the muslin first, so I understand the layout of the pattern pieces.

Meanwhile, in jam-land, I made two more batches of jam this morning: crabapple jelly (technically a marmalade, since it has bits of crabapple floating in it), and damson plum jam. I still have five or six pounds of pears ripening on the counter, and I might make pear-lavender jam with that. Or I might not. Life is full of uncertainty.

Finally, I am very pleased to say that I have acquired this widget:

confectionery guitar

This is a confectionery guitar, which is used for slicing slabs of ganache into neat squares. You put the slab on the bed, bring the wires down to cut the slab, then turn the slab sideways and cut again. Voila! Perfectly square, exactly even chocolate centers. Neater, quicker, and much more professional-looking than cutting the chocolates with a see-through ruler and a drywall spreader, which is what I’ve been doing for the last twenty years.

I’ve wanted one of these for years, but never expected to have one. They cost $1700-3000 (!) for a new one, which is way more than I can justify for something I’d use once a year. And used ones are typically $1000 or more, which is similarly out of budget.

However, I was idly searching on Craigslist a few days ago, and found one for sale very cheap – in Chicago. Ack!! Fortunately, my parents-in-law live in Chicago. They were not only nice enough to go pick it up for me, they’re giving it to me as an early Xmas gift! How incredibly generous of them. They are wonderful people. (Well worthy of extra batches of chocolates.) Hopefully it will arrive in the next week or two, just in time to practice before chocolate season.

And that’s What I Did With My Weekend.

Off to work on that kimono muslin!

Filed Under: All blog posts, food, chocolate, textiles, dyeing, weaving Tagged With: phoenix rising, phoenix rising kimono

September 5, 2013 by Tien Chiu

Flying phoenixes

I spent some time this morning playing with more design simulations, this time looking at what would happen if I put the fabric on the bias. I tried three configurations. The first was decidedly unsuccessful:

kimono with multiple diagonal birds

Why is this not working? Well, first, there are too many ideas. The color gradient does not coordinate with the flight of the phoenixes, and the progressive increases in size are a cool concept but confusing when mixed with the other two ideas. Second, the phoenix flight lines keep driving the eye out of the picture, which is visually confusing. Finally, the color gradients are uneven – they keep repeating from dark to light. Overall, this is a visual mess.

After a few more unsuccessful attempts at using multiple diagonals, I went back to having the birds flying straight up in the central panel. But this time I set the sleeves on the diagonal:

kimono with radiating phoenixes in the sleeves

This was better – or at least somewhat harmonious. But the sleeve lines are still forcing the eye out of the garment, and as a result, there’s no clear focus.

So I swapped the pattern in the left and right sleeves:

kimono with converging diagonals in the sleeves

This is the best of the three – the lines now converge at the top, drawing the focus to the wearer’s head, which is a natural focal point. When worn, it will make the phoenixes fly upward on the sleeves. And it feels more dynamic than the original:

kimono, birds flying straight up

The one difficulty with the diagonal sleeve pattern is that it may not be constructable, both because the bias fabric would drape differently and because I can only weave narrow fabrics. I’d have to piece the sleeves, and there’s no chance that the phoenixes will line up perfectly. I could make that a design element, but, well…more complications!

Also, I still don’t know how the garment would look on an actual person (as opposed to hung over a broomstick on the wall). I won’t know until I can do the muslin mockup, which will be after I visit Sharon, my sewing mentor. I need her help to get my measurements for the pattern.

Still, I think I’m making progress.

Filed Under: All blog posts, textiles, weaving Tagged With: phoenix rising, phoenix rising kimono

September 4, 2013 by Tien Chiu

Planning the kimono

Now that I’ve gotten obsessive jam-making out of my system, it’s time to get back to work, this time on the phoenix kimono. I’ve still got five months before the Convergence Fashion Show entry deadline, which is probably (barely) enough time to get it done.

As you may recall, my working design looked like this:

Phoenix Rising kimono, back

…and I have no clue what to do with the front. I’m also not sure exactly how a kimono is shaped – I know it’s mostly rectangular bits, but there is probably some more complicated stuff at the neckline. And then I need to figure out the correct width for the panels.

After that, I need to think about the patterning for the garment. The phoenixes feel stiff and regimented, and I’d like to have more movement in the piece. John Marshall showed me some Japanese embroidery techniques that may help with that, and I’m considering beading it as well. That way there will be some glitter as the wearer walks.

So here are my outstanding design questions at the moment:

  • How is the garment cut? What are the dimensions of the panels?
  • How is the garment constructed? What will be visible in the front/back?
  • Can I  get the visual design to work?
    • Can I get the intense color contrast I’m after at the top, given that I’ll be crossing yellow with scarlet?
    • Can I add enough motion to the phoenixes to make them interesting, even though they are in rigid order?

These are non-trivial questions and I expect the answers to require significant work. I think the first order of business is to establish the basic cut of the garment, because it has such a profound impact on the visual design. Which means making a muslin.

Simultaneously, I can start weaving some samples to answer the simplest of the design questions. This will require considerable planning. I need to answer these questions before I can make the sample:

  • What materials do I want to use to make the cloth? (I plan to try at least four or five yarns.)
  • Which of my seven or eight drafts do I want to use?
  • Do I want to test the use of color gradients as well as the cloth construction?
  • How wide and how long should I make the sample warp?
  • …and many more.

I’m percolating the ideas through my head –  there are a lot of questions to answer, so I need to give them a day or two to settle. Then I’ll be better able to design an efficient sample. Hopefully it will answer my questions!

Filed Under: All blog posts, textiles, weaving Tagged With: phoenix rising, phoenix rising kimono

August 22, 2013 by Tien Chiu

Striding forward

Yesterday I woke up with good energy for the first time in a week and a half, as the asthma flare-up is subsiding. So I ran out to the garage and got to work on my project for the Handwoven magazine article. The warp is quite narrow, about 12″ wide, and I got it wound, beamed, and about half threaded this morning. I need to wait for a few parts to arrive before I can actually weave it, though, so I probably won’t be able to start until early next week. So instead of working further on it this morning, I got back to my year-long obsession, phoenixes.

I wanted the phoenixes in the kimono to be glittery. Maybe not gaudy, but glittery. At the same time, though, I wanted the phoenixes to transition from scarlet at the bottom of the kimono to yellow at the top…so how to get that effect? I had been thinking of putting the metallic yarn in the warp, but after Bonnie Inouye suggested it might be more manageable in the weft, I decided to pursue that direction.

So I spent this morning drafting up ideas. At the moment, the most promising idea looks like this (click to enlarge):

Phoenix draft, tied weave on a double two tie threading, three wefts

This is a tied weave on a double two-tie threading, with two pattern wefts: a thin metallic gold machine embroidery thread (to add glitter), and a heavier-than-usual thick weft (which makes the pattern). If you look at the full-size image you’ll be able to see it more clearly. It should, at least in theory, produce a nice glittery phoenix.

(Note that the double two-tie threading doesn’t show in the photo, due to the very zoomed out view in my weaving software.)

But, of course, this is a three-shuttle weave. And I only had one of those gorgeous plate-tensioned Bluster Bay end feed shuttles. Clearly this travesty couldn’t be allowed to continue, so I fixed it. See what arrived on my doorstep today?

Two more Bluster Bay plate tensioned end feed shuttles!

Click for the larger photo – the small one really doesn’t do justice to the beauty of the wood. The top one is marblewood, the bottom one African wenge. The wenge in particular has wonderful marbling/striping, and looks a little bit like what would happen if you made mokume gane with milk and  dark chocolates. This is more obvious when seen from the side (click to enlarge, or you’ll miss out!):

bluster bay end feed shuttles, side view

The shuttles are, of course, made with the fantastic workmanship and superb finishing that I’ve come to expect out of Bluster Bay, and I squealed with delight when I saw them. I can’t wait to use them! Such beautiful tools will make multi-shuttle weaving fun.

Meanwhile, I stumbled across this excellent book (in a needlepoint shop, of all places!):

Fashion: The Definitive History of Costume and Style

This book is fantastic! It shows the fashion styles and silhouettes of every era, starting with prehistoric clothing and going right up to the modern era. I’m looking forward to many hours of enjoyable reading.

And, finally, work has been having a week-long extravaganza that they are nicknaming “Skystock”. This being Silicon Valley, of course, every celebration has to involve handing out suitable swag, and this was no exception. So they gave out Skystock T-shirts, which look like this:

T-shirt swag!
T-shirt swag!

Since Skystock is named after Woodstock (of course), someone made the inevitable comment, “This should be tie-dyed!”

And, by a curious coincidence, I have not one but TWO tie-dye parties this weekend…I’m hosting a small tie-dye get-together on Saturday and am going to someone else’s tie-dye party on Sunday. So, of course, the inevitable will happen…

…I’m thinking that a red/orange/yellow flaming star on a black background, centered on the round logo, would be most appropriate. We are talking about launching satellites into space, after all! So I will do that on Saturday. Of course I’ll post photos once I’m done.

What’s on tap for the rest of this week/weekend? Well, aside from the two tie-dye parties, I’m also going to pit another 6 lbs of sour cherries for making into candied cherries, make another big batch of tomato soup, finish getting the Handwoven magazine warp onto the loom, and chat with the person who’s going to help me figure out Creating Craft. I’m also working on revamping my website (no changes to the template, but a fairly large-scale reorganization), and may start work on a kimono muslin. I’m going to start with the pattern for a Japanese uchikake (ceremonial outer kimono), but I expect it to evolve from there.

And I’m looking forward to next week – I somehow managed to score ten pounds of fresh bergamot! which I will pick up on Tuesday. Bergamot is the citrus whose aromatic peel is used to flavor Earl Grey tea, and it is positively divine when candied, especially if dipped in chocolate. And my prior source dried up this year, seriously worrying me – I had enough candied bergamot peel stashed away to get me through the this year’s chocolate season, but wasn’t sure where I could find more. It’s not easy to locate! But I managed to score ten pounds of it, so I’ll be making more candied bergamot peel (and maybe even some bergamot marmalade!) next week.

And that, (honest!) is all to report. I’m glad I finally have some energy again. 🙂

Filed Under: All blog posts, food, textiles, weaving Tagged With: phoenix rising, phoenix rising kimono

« Previous Page
Next Page »

Subscribe to Blog via Email

Information resources

  • Dye samples
    • Procion MX fiber-reactive dye samples on cotton
    • How to "read" the dye sample sets
    • Dye sample strategy - the "Cube" method
  • How-Tos
    • Dyeing and surface design
    • Weaving
    • Designing handwoven cloth
    • Sewing

Blog posts

  • All blog posts
    • food
      • chocolate
    • musings
    • textiles
      • dyeing
      • knitting
      • sewing
      • surface design
      • weaving
    • writing

Archives

Photos from my travels

  • Dye samples
    • Procion MX fiber-reactive dye samples on cotton
    • How to "read" the dye sample sets
    • Dye sample strategy - the "Cube" method
  • Travels
    • Thailand
    • Cambodia
    • Vietnam
    • Laos
    • India
    • Ghana
    • China

Travel Blog

Entertaining miscellanies

© Copyright 2016 Tien Chiu · All Rights Reserved ·