Tien Chiu

  • Home
  • About
    • Honors, Awards, and Publications
  • Online Teaching
  • Gallery
  • Essays
  • Book
  • Blog
  • Dye samples
You are here: Home / Archives for qiviut shawl

January 12, 2011 by Tien Chiu

Design

I’m hot into fabric design, playing with painted warp simulations in Photoshop.  Unfortunately, the simulations are pretty crude, and I don’t think they will be true-to-life with the real thing.  I will have to dye and weave up samples to see whether it actually works, which of course burns precious time.  But I think it’s necessary.

Here are a few of the ideas I’ve been playing with:
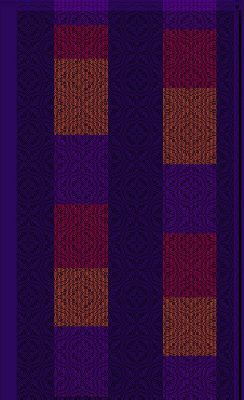
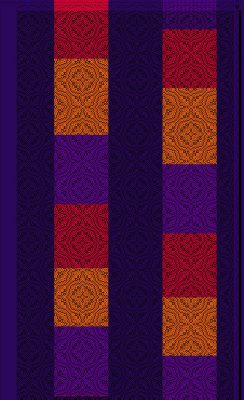
1st simulation.  Painted warp stripes against a solid background.  Here the painted warp ends alternate with solid color ends in groups of 3 inside the painted warp section, producing a striped effect.
1st simulation. Painted warp stripes against a solid background. Here the painted warp ends alternate with solid color ends in groups of 3 inside the painted warp section, producing a striped effect.
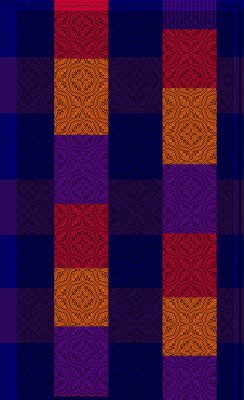
2nd simulation.  Painted warp stripes against a solid background.  The painted warp stripes are "solid" painted warp, not alternating with the background.
2nd simulation. Painted warp stripes against a solid background. The painted warp stripes are "solid" painted warp, not alternating with the background.
3rd simulation.  "Solid" painted warp stripes in bright colors alternating with painted-warp stripes in darker colors
3rd simulation. "Solid" painted warp stripes in bright colors alternating with painted-warp stripes in darker colors
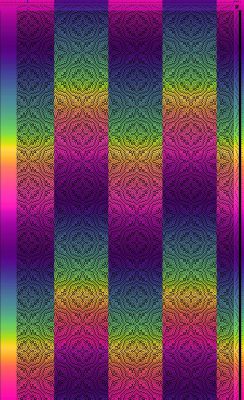
And now for something completely different.  Simulation 4 is the same painted warp, but with the pattern shifted slightly.  I like this a lot better than the other three.
And now for something completely different. I like this a lot better than the other three.

I am not satisfied with any of these yet and will play more with colors and pattern until I arrive at something I like enough to test.

Meanwhile, here is the qiviut-scarf pattern on the loom:
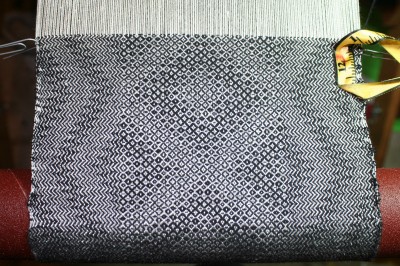
cashmere scarf, in progress

This is being woven up in black cashmere the same size as the qiviut, to “test out” the pattern before I weave with the REALLY expensive stuff!  So far I have woven a bit over half the scarf, and I expect to finish it today.  It will probably take me two more days to weave up the qiviut version, which means I can get started on the samples for the Handwoven garment challenge over the weekend.

Which, of course, also means that I’d better get cracking on design!  So back to work I go.
Filed Under: All blog posts, textiles, weaving Tagged With: kodachrome jacket, qiviut shawl

January 4, 2011 by Tien Chiu

Qiviut!

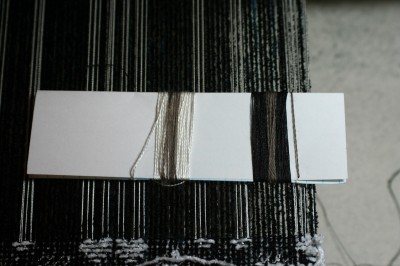
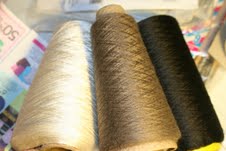
The cone of qiviut arrived!  It looks remarkably innocuous for something so expensive.  Would you believe that this small cone of yarn (center) cost $360 (!!!) ?

qiviut cone, against white and black silk.  The flash makes the qiviut look slightly lighter than it actually is.
qiviut cone, against white and black silk. The flash makes the qiviut look slightly lighter than it actually is.

Well, fortunately I didn’t pay for it, and apparently it’s worth it to my friend (he lives in Alaska and wanted to give an Alaska-oriented gift to his daughter).  So I will have $180 worth, aka 2 ounces, of qiviut yarn to play with at the end of this scarf.  Probably still a bargain for my friend considering the labor involved in designing and weaving the scarf, but a nice bonus for me since I would have been happy to weave it up for free!  (Friends being friends, and all.)

I did a wrap to see whether a black or white silk warp would be more appropriate, and decided that either black or white would work, though they’d give two totally different “feels” to the qiviut:

qiviut yarn, wrapped on white and on black silk, no flash

I think I would weave it up with white, because the contrast is better, but I think my “client” will prefer black.

Meanwhile, in the background of the second photo, you can see my diversified plain weave sample – have woven up about a foot and a half so far.  I plan to weave another foot or so tonight, then measure it, dye  the first portion of the sample, and let it batch overnight.  Measuring it beforehand will give me an idea of the shrinkage, and after dyeing the finished sample will give me a good feel for the “hand” of the final fabric.

And my community college drawing class is starting this week, so I will need to listen to the lectures and start the first lesson…lots to do!

Filed Under: All blog posts, textiles, weaving Tagged With: qiviut shawl

December 29, 2010 by Tien Chiu

Whew!

Three hours of intense concentration this morning yielded this monstrosity:

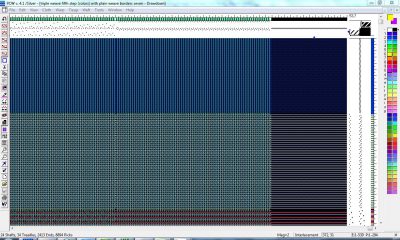
Triple weave draft, showing borders

Since this is virtually illegible, I’ve uploaded a .zip of the .wif file here: triple weave draft, zipped .wif file.  It probably isn’t much more comprehensible, but at least you can see it a little better!

Basically what’s going on is three warps and five wefts (!).  Two of the wefts are thick wefts, and I’ve indicated those in red and brown.  They’re also larger than the others.  One weft (dark blue) is for the middle layer, and the two tabby wefts are white and yellow, respectively.  The black warp is the middle layer, the other two are top and bottom layers.  The first section is solely middle layer, the second section is all three layers but without the thick wefts.  The center section is three layers with the thick wefts.

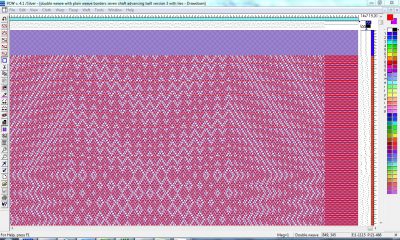
This is very difficult to visualize since weaving software doesn’t handle three layers gracefully, so here is one of the intermediate steps, a double weave version without the middle layer, shown in Fiberworks PCW doubleweave view:

Double weave version, with side border
Double weave version, with borders

And since it’s hard to make out any detail, here’s the double weave with plain weave borders zip file.  (Unzip to get the .wif file.)

I’m not kidding when I say that this draft took me three hours.  It was incredibly tricky to put together and I’m sure it contains errors, so don’t assume this is a weavable draft!  It was more of a thought experiment, to rough out the process of creating such a monstrosity, rather than a polished version.  I have no idea whether it would weave up gracefully – I think it probably needs significant massaging, first.  (For one thing, I didn’t think about whether it would weave independent layers, a tube, or connected layers when sequencing the treadles.  Also, the three layers need to be stitched together!)

Having spent three hours generating this, I realized that I was probably going to have to redesign the draft after determining the proper sett for two layers of plain weave and one layer of tied weave.  This one is designed around a sett of 120 epi, and the correct sett for three layers is probably considerably less, maybe 108 or 96?  The odds are that I will have to scale down the design, which would mean having to redo the whole thing.  But I learned a lot this morning, and captured the steps in Evernote, so I don’t think it will take me three hours next time!

Filed Under: All blog posts, textiles, weaving Tagged With: doubleweave, qiviut shawl, triple weave

December 28, 2010 by Tien Chiu

Seven-shaft drafts

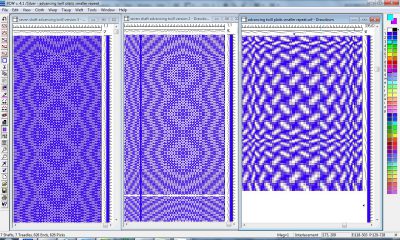
I spent most of the flight to Chicago playing with seven-shaft drafts.  I wanted to try some advancing twills, and I had seen a lovely draft of Bonnie Inouye’s on page 116 of Doramay Keasbey’s Pattern Techniques for Handweavers that I thought would adapt nicely to a seven-shaft variation.  So I cooked up some variations, and here they are (click to zoom in):

seven-shaft weaving drafts
Seven-shaft drafts - two advancing twills and one plaited twill

The rightmost draft is the one based on Bonnie’s draft, and I believe the process for creating it is more-or-less explained in her book Exploring Multishaft Design.  (Which, by the way, I cannot recommend highly enough for anyone wanting to learn how to draft their own designs.)

While I absolutely love the right-most draft, I think the one on the far left is most suitable for the shawl I have in mind.  It has more visual complexity/interest than the center piece.  And since it is a more contained pattern,  I think it will cope better with being “framed” in the black and white rectangles than the one at far right.  The rightmost pattern just begs to run right up to the edge of a piece, to allow the trompe d’oeil to play freely.

Off to bed! Tomorrow’s another (no doubt very interesting!) day.

Filed Under: All blog posts, textiles, weaving Tagged With: qiviut shawl

December 28, 2010 by Tien Chiu

Complex designing!

I spent a couple hours this morning working on the design for the qiviut shawl.  It’s complicated.

Basically what I want is a black rectangle (the center layer), with a white rectangle outlining the qiviut/silk pattern.  Sort of like this:

Mockup of shawl
Mockup of shawl

The black will be the center layer, the white and brown the top and bottom layers.  The white selvages will float freely, but the brown portions will be unobtrusively stitched together.

The brown section will be qiviut-dominant, to show off the yarn, and will be in a complex geometric pattern, perhaps an advancing twill pattern.  The white section will be plain weave.

I was racking my brains trying to figure out how to get the all-white sections when using a brown weft, and finally realized I could do it by making the brown section a tied weave, and threading up the white sections on two shafts that only interlace with the tabby weft.  It’s complicated and difficult, but I think it’s worth a go!

Here is an excerpt from my Evernote notebook that outlines how I plan to go about this:

  1. Come up with an advancing twill draft on 7 shafts.  (Odd and even shafts need to alternate so allow conversion to double two-tie threading in step 2.)  Tie-up can allow long floats since it will be tied down later.
  2. Convert it to a double two-tie unit threading by interleaving the ties in the threading and adding tabby shots to treadling. 9 shafts are now being used.
  3. Add two shafts of plain weave for the borders on either side, and work out the correct tie-up/treadling so that the supplementary weft does not interlace with the plain weave borders.  11 shafts now being used; draft for top and bottom layers is complete.
  4. Once the top layer draft is done, create the triple weave on a not-quite-parallel threading draft by interleaving three drafts:  (1) the double two tie draft, (2) a simple two shaft plain weave using the tie-ups shown above, and (2) the double two-tie draft with the tie-up reversed (so the “right side” shows on both layers).  Interleave threading and treadling.  (This method won’t work for interchanging layers, since there aren’t an equal number of shafts per layer, but it does work for three more-or-less independent layers.)
  5. Add stitchers to hold the three layers together.  The best stitching might be done by taking a thread from layer 1 and interchanging with layer 3, but need to weave it up to know.  Check with Robyn spady’s monograph (if I have it) to make sure I have the stitching right.
  6. Check design to whatever degree possible by looking at the draft.
  7. Thread it up and weave a sample.
  8. Note that three warps are required, two white silk and one black silk.  Since the qiviut is 7000 ypp, it makes sense to have all three warps be 60/2 silk.  Hang one warp off the back of the loom, the other on a trapeze.  Two sets of spacers to make sure the warps don’t interfere with each other.  Do I need a second raddle?
  9. Also, five shuttles are required (two each for the tied weave layers and one for the middle layer).  Fortunately I have five shuttles!

As I said in my notebook, sounds complex and difficult, but ultimately rewarding!

There are a couple things that worry me about this design:

  1. slippage on the sandpaper beam as it is winding on.  Ruth mentioned that the sandpaper beam is needed for this kind of weaving because the layers wind unevenly onto the cloth beam, but I don’t know how well three layers (especially with free-floating selvages) will work on the sandpaper beam.
  2. different number of picks per inch for the various weaves, especially tied weave vs. plain weave.  Yes, I know tied weave ppi is supposed to be nearly the same as for plain weave, but I don’t know if that’s actually the case in practice.
  3. Sett.  I don’t know if the sett for a triple weave is going to be too dense to fit gracefully through the reed!

And of course I’d have to experiment to determine the right sett, and so on, but that doesn’t scare me: I can work that out along the way.

This is fascinating but mentally exhausting: I’m glad I’m on vacation!  I’m not sure I would have the focus to puzzle this all out if I didn’t have so much empty time to fill.

Filed Under: All blog posts, textiles, weaving Tagged With: qiviut shawl

« Previous Page

Subscribe to Blog via Email

Information resources

  • Dye samples
    • Procion MX fiber-reactive dye samples on cotton
    • How to "read" the dye sample sets
    • Dye sample strategy - the "Cube" method
  • How-Tos
    • Dyeing and surface design
    • Weaving
    • Designing handwoven cloth
    • Sewing

Blog posts

  • All blog posts
    • food
      • chocolate
    • musings
    • textiles
      • dyeing
      • knitting
      • sewing
      • surface design
      • weaving
    • writing

Archives

Photos from my travels

  • Dye samples
    • Procion MX fiber-reactive dye samples on cotton
    • How to "read" the dye sample sets
    • Dye sample strategy - the "Cube" method
  • Travels
    • Thailand
    • Cambodia
    • Vietnam
    • Laos
    • India
    • Ghana
    • China

Travel Blog

Entertaining miscellanies

© Copyright 2016 Tien Chiu · All Rights Reserved ·


Loading Comments...