Tien Chiu

  • Home
  • About
    • Honors, Awards, and Publications
  • Online Teaching
  • Gallery
  • Essays
  • Book
  • Blog
  • Dye samples
You are here: Home / Archives for painted warp

June 7, 2011 by Tien Chiu

Ready to weave!

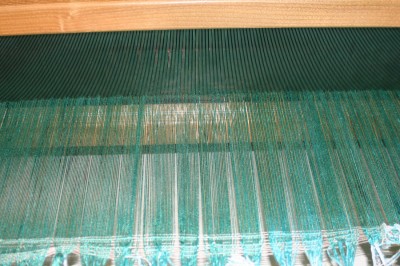
Yesterday I finished threading, sleying, and tying on, and also threw the first few picks before we went out to dinner:

Ready to weave!
Ready to weave!

I am still weaving the header, as you can see; as soon as the warp evens out a bit and the bouts are fully separated, I’ll start debugging the warp.  Hopefully there shouldn’t be too many threading/sleying errors – it’s threaded up straight draw, which is easier to thread/correct than a more complex threading!

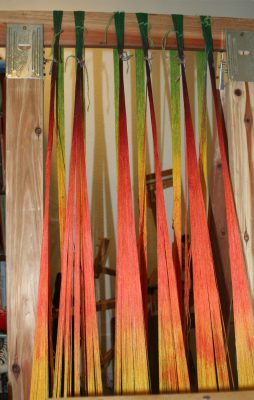
Here is a shot of the warp on the trapeze:

The warp on the trapeze

The ties for the registration marks are at the top (enlarge the photo to see them more clearly).  I have got them lined up to within about 1/2″ of each other.  See how that lines up the warp color changes as well?

I’m a little concerned about the splotches of orange in the yellow/gold sections, and whether that will result in visible vertical lines at the edges of the bouts.  If it turns out to be a problem, next time I will do as Julie suggested a few blog posts back and interpolate the bouts – one thread of one bout, one thread of the next bout – either through the entire bout or just at the edges, to blur them a little.

But on the whole, I’m happy with the setup.  Now let’s see what happens when I actually start weaving!

Filed Under: All blog posts, textiles, weaving Tagged With: autumn splendor, painted warp

June 3, 2011 by Tien Chiu

The painted-warp puzzle

While I spent most of this week biting my nails and waiting by the phone (job interview nerves), I have wound and painted a new seven-yard sample warp, one which I hope will help me solve some of the process puzzles around making a painted warp (almost) precisely reproducible.

The problem is this: I need ten identical, or nearly-identical, painted warp/knitted-blank weft panels to make the jacket.  (Front, side front, back, side back, + sleeve = 5 panels x 2 sides = 10 panels.)  However, painted warps are notoriously difficult to reproduce precisely, especially when weaving multiple painted warp panels in a row.  Painted warps, in fact, tend to belong squarely to the improvisational weaver, not to inveterate planners like me.  Combine it with a knitted blank, which also tends to be imprecise, and making the panels match becomes that much harder.

So.  First, it is true that no two painted-warp panels will ever match precisely, because the dye flows differently, the warp shifts a little, etc.  That’s OK.  Mostly what I want is for the color changes to occur in about the same spot all the way up and down the garment, so they won’t be visually jarring.  That’s precise enough for me.

Second, the puzzle of how to make ten panels of painted warp match each other – especially difficult since warp bouts shift during painting, and while being beamed onto the loom.  The inaccuracies add up, and can easily amount to as much as 6 inches over the course of a 7-yard warp.  This is pretty simple to solve, though.  All you need is registration marks (so you can line up the bouts correctly when weaving a new panel) and a way to adjust the bouts individually.  The first is easily done by wrapping a tight choke tie around each warp bout at the start of each panel’s length of warp.  The choke tie resists the dye and results in a highly visible white spot on each bout; then all you have to do is line up the white spots, and you know the bouts are correctly arranged.  Adjusting the bouts is easy if you simply throw them off the back of the loom and weight them individually, rather than beaming onto a warp beam – then you can easily pull them forward/back as needed.  (I will use a trapeze for this, as I did with Kodachrome, so I can weave longer before having to adjust the weights.)

To make each panel match the others, simply paint next to a measuring tape – three inches of this color followed by three inches of that color, etc.  I used this technique quite effectively for my Kodachrome jacket.

Next is the puzzle of the knitted blank, which can be separated into three parts:

  • How do I paint a knitted warp so the color changes are consistent across 10 knitted blanks?
  • How do I know how long to make each section of color in the knitted blank? In this case the color changes in the knitted blank weft, once woven up, need to correspond to the color changes in the painted warp. This is decidedly nontrivial.
  • How do I know where on the warp to start weaving the knitted blank weft, so that the color changes line up correctly?

The first question is easy to answer: if you place marker rows in the knitted blank (as I showed a few blog posts ago), it’s easy to paint each section a different color and get precise color changes that way.

The second question is also relatively easy to answer.  Basically, you need to figure out how much weft yarn goes into an inch of fabric, and knit up your blank with markers every 1″ worth of weft.  To do this:

  1. Weave a short sample on the warp, and count the number of picks per inch.
  2. Unweave part of it – say, about 10 picks’ worth – and measure the unwoven weft to determine exactly how long an average weft shot is.
  3. This, in turn, tells you how much weft is required to weave one inch of fabric:  (Length of weft shot ) x (picks per inch) = (length of weft required to weave one inch of fabric).
  4. Knit a short sample on the knitting machine at a width you think is appropriate.  Unravel several rows and measure the yarn.  If you unravel four or five rows, you should get a pretty good idea of how many inches there are in a row of knitting.  Adjust the number of stitches up and down until you’re happy with the length of yarn in a row.  (For my sanity’s sake, I like to make one row of stitches equal in length to one or two shots of weft; that makes calculations easy.)
  5. Figure out how many rows are required to make one inch’s worth of weft.
  6. Knit up a short sample blank, putting in a marker row after every inch’s worth of weft.
  7. WEAVE A SAMPLE to make sure that all those wonderful calculations worked out more or less accurately, before committing to an entire knitted blank.  There are a lot of variables and opportunities for the yarn to shrink, especially when dealing with elastic fibers.  An inch’s worth of weft  should produce roughly an inch’s worth of fabric – plus or minus about 5%.
  8. Knit your blanks, dye them identically, and start weaving!

(I know that doesn’t sound like a very simple solution, but it’s the simplest I know of.)

The third question was the stickiest one for me.  The best solution I could think of was measuring: after all the registration marks are lined up, I will start weaving the knitted-blank weft at exactly 4″ past the registration mark.  This may not be perfect, but at least it will be consistent across each panel.  If the knitted blanks are painted consistently, and the warps are lined up and also painted fairly consistently, the result should be a relatively consistent panel.

One could ask whether I’m going too far out of my way to make sure that the panels match.  After all, part of the interest in painted warps is in the complexity of the natural color changes; why not let the panels be somewhat different from each other?  Won’t that just add to the color complexity/texture/interest of the garment?

Well, perhaps.  But there will be plenty of color complexity/texture/interest in the garment even if the panels all match.  I am not trying for complete uniformity – that is basically impossible because of the many variables involved – but I want to keep the variation between panels subtle, not jarring.  And to do this, I need greater control over the warp and weft colors than is typically attempted.  Thus, the calculations and the lengthy sampling process.

The painted warp is in the oven baking (to set the dyes) as I type; tomorrow morning I’ll rinse it out.  While it’s drying, I’ll wind and beam on the metallic gold warp, which goes onto the sectional beam.  Between that, a guild meeting, and a craft group meeting, I’ll be surprised if I get anything else done tomorrow.  But I think that will be enough!

Filed Under: All blog posts, textiles, dyeing, weaving Tagged With: autumn splendor, knitted blank, painted warp

May 24, 2011 by Tien Chiu

Now THIS is more like it!

I spent all day yesterday visiting with fiber artists: first a three-hour drive to Ukiah for lunch with Holly Brackmann, then a two-hour drive to Napa to the Silverado Weavers Guild, where I was giving the evening program.  I didn’t get home until well past bedtime, but I thoroughly enjoyed every moment of visiting both Holly and the Napa guild.  Holly had some amazing devore samples that she showed me, and also showed me some wonderful textiles from her world travels – it was fun chatting with her and I’d love to see her again.  My presentation at the Silverado Weavers guild seemed to be well-received (it was about the creative process), and it was lovely meeting up with several people I’d been corresponding with.  My one regret was that I didn’t get to see Barbara Stafford’s rugs.  However, Mike and I are going back to Napa for our anniversary – yes, we are coming up on our first anniversary! doesn’t time fly? – so perhaps we can stop in then.

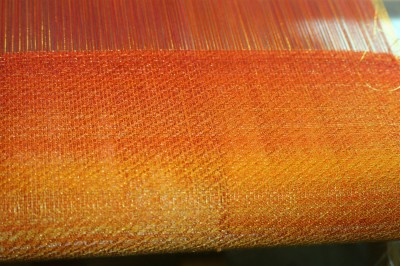
Anyway, back to weaving: I finally got the warp threaded, sleyed, and tied on.  I wove a few inches with a solid colored weft, and didn’t really like the feel of it.  So I dyed my two knitted blanks, dotting on the colors so the yarn would come out randomly variegated.  And….ta daa!

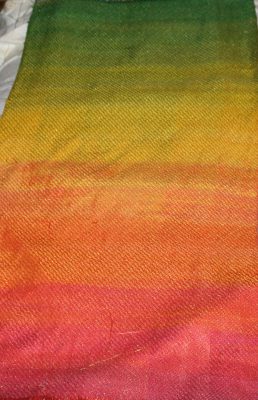
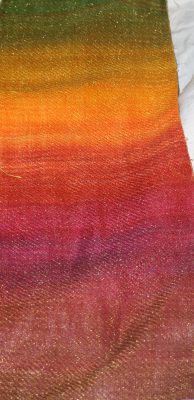
Painted warp, knitted blank

I love this.  (Click for the larger version.  It’s worth it!)  The variegation in the warp and the weft produce beautifully complex color play, while the weave structure adds texture both to the physical fabric and the color.  It is even prettier in person! – the glitter of the gold doesn’t show in the photo.  I am loving every moment of weaving up this sample and can’t wait to see how the rest of it comes out.  The warp is progressing into maroons and purples, and will eventually  get to brown; the wefts have a similar color progression, but in different shades.

Off to bed!  The sooner to bed, the sooner I can get up again and start weaving!

Filed Under: All blog posts, textiles, dyeing, weaving Tagged With: autumn splendor, knitted blanks, painted warp

May 18, 2011 by Tien Chiu

The good and the bad (but not ugly!)

I finished warping, tied on, and started weaving.  Then I noticed that the warps weren’t lined up properly (the first section was white, so it wasn’t obvious initially).  I sighed, cut off the five inches I’d woven, advanced the bouts so they did line up, and then re-tied on.  (This was more laborious than you’d think since the warp was in three layers).  I wove another three inches, and realized that this threading won’t do.  I had interspersed the bouts in wide stripes, hoping to make the stripes somewhat visible – this turned out to be a stupid thing to do because now the stripes dominate, giving a very rigid look.  Which I should have known, and would have known if I’d simulated it in Photoshop first.  *sigh*  C’est la vie, I guess.

Here are photos of the warp, showing the striping:

painted warp, showing the striping.  The colors are beautiful, and the striping is too, just not the effect I want!
painted warp, showing the striping. The colors are beautiful, and the striping is too, just not the effect I want!
painted warp, side view, showing off the stripes more clearly

Interestingly, the fabric looks quite different from the side and from the front – it has a beautiful iridescence to it, and a lovely glitter from the gold.  All of which makes it that much more difficult to cut off and rethread the damn thing.  Due to the way I’ve set up the warps, I think I will have to intersperse the warps in groups of four – will have to think that through – that would make each warp stripe 1/10″ wide.  But if I can intersperse them every other thread, so much the better!

Fortunately it should be possible to recreate the cross and separate out the three layers of warp again.  It will be a bit tricky, but feasible.  However, I am NOT looking forward to re-re-rethreading the warp.  I enjoy the warping process, but this is a little much!  I want to get to weaving.

I have considered whether weaving off this 48″ panel would produce useful results – that would let me get some weaving done before having to rethread – but have reluctantly concluded that it will not.  The vertical stripes kill the feeling of organic movement – the only question this sample would answer would be “Will the cloth be strong enough?” That is, admittedly, my primary question, but I want to be able to answer other design questions as well.  So, tempting as it is to continue on, there is really nothing for it but to cut off and re-thread.

Filed Under: All blog posts, textiles, weaving Tagged With: autumn splendor, painted warp

May 16, 2011 by Tien Chiu

Painted warp

I was out sick from work on Thursday and Friday, and feeling rather listless over the weekend, which is why you haven’t heard much from me.  I did take a good chunk of time on Saturday to visit the DeYoung Museum and the Legion of Honor, which were showing “Balenciaga and Spain” and “Pulp Fashion”, respectively.  The former is a collection of fabulous clothing by the French-Spanish couturier Balenciaga, with a few notes on the Spanish influences in his work; the latter is a group of interpretations of European costume (mostly dating back a century or three) done in paper by Isabelle de Borchgrave. I found “Balenciaga and Spain” to be fantastic – I wish I’d brought a notepad to scribble down some of the inspirations it gave me – but “Pulp Fashion” struck me as more a curiosity than something of intrinsic interest.  It’s nice to know that you can make paper imitate cloth, but why not create the real thing?  Of course, that wouldn’t be interesting enough to make it into a museum, which makes me wonder why.  Is it part of the dividing line between “art” and “craft”?  Seems rather odd.

Anyway, I have painted the warp, and here are some photos:

Stripes of solid color
Gradual color gradations
Stripes, offset from each other
Warp painted in mottled colors

I should mention that there are four warp chains, arranged in pairs which are then painted different colors.  In the top, I have done solid stripes of color across all four warp chains; in the second from the top, I’ve mixed the colors to give more gradual shading.  The third features colors offset somewhat from each other, so the colors will blend when the warp chains are interspersed during warping; the last has mottled color.  I’m not sure the last will be successful; it’s difficult to get both mottled color and good dye penetration.  I do have some ideas for next time, though.

Anyway, given my general listlessness and lack of motivation, it should be no great surprise that I muffed the threading of the painted warp.  It was a fairly complicated setup, with three sets of lease sticks, and I accidentally swapped some positions that I shouldn’t.  This resulted in the inversion of two layers of warp and a thoroughly unworkable result – only discovered, of course, after I had finished threading and sleying, and was getting ready to tie on.  I said some bad words, then pulled out all the gold threads, which will need to be rethreaded, interspersed with the tencel threads.

Other than that, some furniture alteration/rearrangement (my studio now has more open space and the desk has been lowered by 2″ to allow me to sit more comfortably at it), and shredding about 3 years’ worth of old credit card bills, not much got done over the weekend.  Oh well; you can’t always have everything.

The good news is that I am feeling much better today, so am hoping to get the warp fully threaded and start weaving today.  Maybe a little ambitious, but, well, we’ll see.

I leave you now with two truly impressive photos taken by my friend Julie at the Silk Museum in China:

Mystery loom at Silk Museum in China.  How does this work?
Mystery loom at Silk Museum in China. How does this work?

This one intrigues me because there is no sign of treadles and there are a godawful number of frames.  I suspect it may be a drawloom of some sort,  but would love to know for sure; if anyone knows, can you please leave a comment to enlighten me?

And this one (according to other blogs) is a drawloom, operated by  two people (!):

drawloom at silk museum in China

That has got to be the largest handloom I have ever seen.  If you click to see the larger version you can see the person perched on top of the loom, manipulating the harnesses as the other person weaves.

Filed Under: All blog posts, textiles, dyeing, weaving Tagged With: autumn splendor, painted warp

« Previous Page
Next Page »

Subscribe to Blog via Email

Information resources

  • Dye samples
    • Procion MX fiber-reactive dye samples on cotton
    • How to "read" the dye sample sets
    • Dye sample strategy - the "Cube" method
  • How-Tos
    • Dyeing and surface design
    • Weaving
    • Designing handwoven cloth
    • Sewing

Blog posts

  • All blog posts
    • food
      • chocolate
    • musings
    • textiles
      • dyeing
      • knitting
      • sewing
      • surface design
      • weaving
    • writing

Archives

Photos from my travels

  • Dye samples
    • Procion MX fiber-reactive dye samples on cotton
    • How to "read" the dye sample sets
    • Dye sample strategy - the "Cube" method
  • Travels
    • Thailand
    • Cambodia
    • Vietnam
    • Laos
    • India
    • Ghana
    • China

Travel Blog

Entertaining miscellanies

© Copyright 2016 Tien Chiu · All Rights Reserved ·


Loading Comments...